Home

Beaver Boarding Tutorial (hvy picture)

Posted By: trapper ron

Beaver Boarding Tutorial (hvy picture) - 03/19/14 07:52 PM

This is what works for me. First off pelt your beaver clean skinned or rough skinned. If rough skinned, flesh on your beam or whatever works for you. For me I clean skin. At one time my pelting was really clean, now with the hand fleshing tools I use it is very easy to remove a bit of meat and fat. I use a beaver/fur handling table that is the size of a beaver board, 32" x 48".

I determine what size oval it is going to be by turning the beaver sideways on the board and pulling the center on each size tightly out to the top and bottom of the oval patterns. The oval it comes to will be very close to the size ring to use. Next I turn it back to the way it is going to go on the board. Place the eyes just below the ring you are going to nail to. Nail the lips and nose out beyond the oval. Nail the two corners of the tail out past the oval. nail at center of each side, between the center and head , and between the center and tail on the oval you are going to use.


Use your hand small hand flesher to go all around the outside edge of the pelt to make sure it is clean. I then nail up one side to just about the head, then the same on the other side. Then down to just about the where the corner nails are at the tail.


You can now use your larger hand fleshing tool and remove any meat or fat left on the pelt. Lift the legs and trim them, and cut the ears out. Continue nailing around the head just ahead of the eyes.


Nail around the bottom edge, leaving those two tail corners out past your oval.


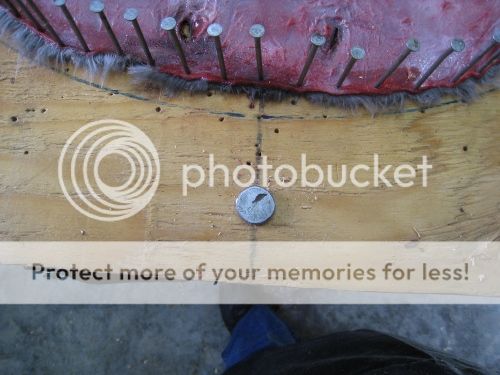
Trim the nose, lips and whiskers off just ahead of the nails. Cut the two corners off at the tail.


You can leave the ear holes open or close them with one nail. The front leg holes are nailed with two nails. do not overlap more than about 1/8 inch, or just enough for the nail to catch. Close the holes by nailing from the outside toward the center. If nailed from center to outside you will catch the skin flap when you use your beaver comb to comb the fur later.


Repeat with the rear leg holes using three nails.


This is your finished product.


These are my tools for boarding a beaver.


Drill a hole in the top center and bottom center of your boards to hang them up. I also drill a hole each end of the beaver table and use a large spike dropped through. Then the board stays in place as you are nailing and fleshing you beaver.


So if you really want to get anal about your put up.

Posted By: newhouse114

Re: Beaver Boarding Tutorial (hvy picture) - 03/19/14 08:03 PM

Ron, where can you buy those fleshers on the left side of the pic?
Posted By: huntingmaxima

Re: Beaver Boarding Tutorial (hvy picture) - 03/19/14 08:09 PM

Excellent job.
Posted By: AKHowler

Re: Beaver Boarding Tutorial (hvy picture) - 03/19/14 08:25 PM

Well done thanks Ron
Posted By: Chickenminer

Re: Beaver Boarding Tutorial (hvy picture) - 03/19/14 09:55 PM

Nice! Appreciate you taking the time to post that Ron.
Posted By: Spek Jones

Re: Beaver Boarding Tutorial (hvy picture) - 03/19/14 11:05 PM

Thanks for posting this, Ron. May I ask, what is your reasoning behind not pulling the hide up on the nail's? Is it a step you don't feel is necessary, or is there some other reason for not doing that?
Posted By: RichM AB

Re: Beaver Boarding Tutorial (hvy picture) - 03/19/14 11:18 PM

Thanks Ron, great post!
Posted By: Boco

Re: Beaver Boarding Tutorial (hvy picture) - 03/19/14 11:26 PM

Nice job on the beavers(and other fur there)Ron.
Did you do the smaller one for competition-it looks about perfect.
Posted By: trapper ron

Re: Beaver Boarding Tutorial (hvy picture) - 03/20/14 12:14 AM

Originally Posted By: Boco
Nice job on the beavers(and other fur there)Ron.
Did you do the smaller one for competition-it looks about perfect.


I changed the picture of it for a clearer view. Yes hoping it is near perfect for competition. Have not done one like that since I won the old OTA trophy way back when for the best handled beaver. First time it ever went out of Ontario. I was a bit slow on the speed skinning and put up because I clean skinned and sewed all the legs, 23 minutes total time.
Posted By: Boco

Re: Beaver Boarding Tutorial (hvy picture) - 03/20/14 12:20 AM

Yes, the beaver competition is stiff.One nail not spaced right or one eye hole a fraction of a measurement out of line can mean the difference between 1st and 2nd place.The winner is always a near perfectly put up pelt.
Posted By: Nessmuck

Re: Beaver Boarding Tutorial (hvy picture) - 03/20/14 12:45 AM

What the DE Razor for ...?? DE = Double Edge
Posted By: trapper ron

Re: Beaver Boarding Tutorial (hvy picture) - 03/20/14 01:58 AM

Originally Posted By: Nessmuck
What the DE Razor for ...?? DE = Double Edge


This is something my old friend Wayne Sharpe taught us. He runs the NAFA depot in Prince George and is one of our certified BCTA instructors. Been using it for many many years.

It is made from an old safety razor, the ones that had the teeth on them so you would not cut your face. You file those teeth off so the blade sticks out about 1/16".

An old razor with the teeth, they came in many styles:


Parts break down of the one I use:


Razor showing the teeth off and the blade out about 1/16":


So now how to use it. It is basically a razor sharp fleshing tool you use with great caution. You only go in a straight line down, not slipping to one side or the other. We use it for those tough to flesh cheeks on the beaver and the heavy fat and gristle at the tail end. There is no tool better for doing those two tough strips of fat on an otter tail. You first flesh with your two hand flesher on a beam or your one hand flesher on the board. The razor is used for clean up of those tough spots.
Posted By: Dirt

Re: Beaver Boarding Tutorial (hvy picture) - 03/20/14 04:32 PM

[quote=trapper ron]

So if you really want to get anal about your put up. [quote]

Pretty sure I'll get all the anal action I can stand when I send the hides off to auction. frown
Posted By: Allan Minear

Re: Beaver Boarding Tutorial (hvy picture) - 03/23/14 12:34 AM

Thank you Ron for the post I really enjoyed seeing a different way to put up beaver pelts . The razor is a great idea I've used the same sized Swedish hoof knife as well as the small size .
Allan
Posted By: saskamusher

Re: Beaver Boarding Tutorial (hvy picture) - 03/30/14 09:06 PM

not saying its right or wrong but if we nail legs shut we pull hip side out to armpit side then hopefully gives armpit leather the most slack so no white stretch marks dont show up that's also why we usually sew our leg holes then the leather can shrink in what ever direction it wants not being nailed to board . one time we sold beavers to a fur buyer and he docked us huge because of white stretch marks on arm pits not sure if it is a real downgrade or jus a excuse to down grade our fur . only difference between a fur buyer and a fur theif is twenty feet of rope ,,,jus kidding ha ha but since then we try our best not to over stretch ...
Posted By: trapper ron

Re: Beaver Boarding Tutorial (hvy picture) - 04/01/14 04:21 PM

Originally Posted By: newhouse114
Ron, where can you buy those fleshers on the left side of the pic?


Here is the reply I got from Cariboo Custom Knives as to suppliers: (hope this is not advertising)

Bailey's Trapping Supplies
William G. Bailey III
290 Cornhill Road
Boscawen, NH 03303
USA

Cascade Trapping Supply
7316 20th Ave. E
Tacoma, Washington 98404
USA

Molnar Outdoors
9191 leavitt rd
elyria, OH 44035
United States

Okie Cable & Trap Supply
PO Box 195
Crowder, OK 74430
USA

Sterling Fur Company
11268 Frick Rd.
Sterling, Ohio 44276
USA

Wildlife Control Supplies
45 Russell Road
East Granby, CT 06026
Posted By: frozen okie

Re: Beaver Boarding Tutorial (hvy picture) - 04/01/14 05:45 PM

Pete called it a stirrup flesher , that thing worked pretty good, it's on my list to get
Posted By: northway

Re: Beaver Boarding Tutorial (hvy picture) - 04/01/14 09:05 PM

Thanks Ron! I realize I've been doing it wrong! I've got one of those razor's also. I really like the grizzle getter for fleshing!
Posted By: SK-Trapper

Re: Beaver Boarding Tutorial (hvy picture) - 04/02/14 01:52 PM

Ron do you have to sharpen those stirrup fleshers? Or are they just used dull?
I would like to try a grizzle getter they look like they would work great.
Posted By: Allan Minear

Re: Beaver Boarding Tutorial (hvy picture) - 04/02/14 04:42 PM

SK , I've had my ok stirrup / hoof knife for a few years now and it's still very sharp . One of them is a one hand size with a cutting edge of about an inch it's quite handy also . I've yet to try a grizzle getter yet .
Allan
Posted By: Nessmuck

Re: Beaver Boarding Tutorial (hvy picture) - 04/04/14 02:53 AM

Well this one ain't going no where near a beaver...A Birthyear (1956) Gillette Super Speed RedTip.....will have to find a junker at the flea market !!
Posted By: trapper ron

Re: Beaver Boarding Tutorial (hvy picture) - 04/04/14 03:15 PM

Originally Posted By: SK-Trapper
Ron do you have to sharpen those stirrup fleshers? Or are they just used dull?
I would like to try a grizzle getter they look like they would work great.


I have touched up the sharp edge of the large one once. Just used a small pocket hone. The small one is still sharp been using these for many many years.
© 2024 Trapperman Forums