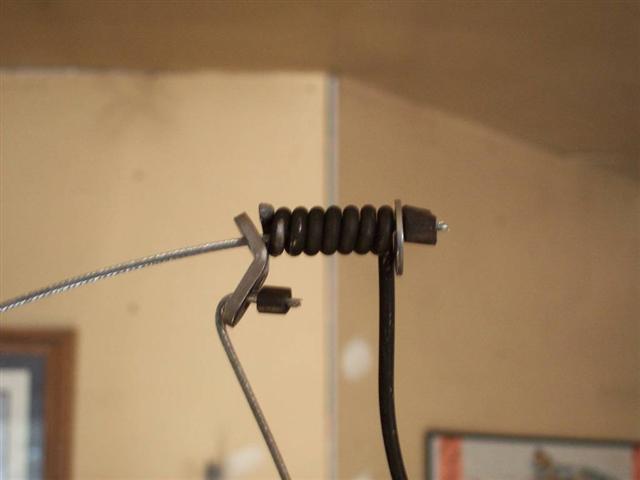
Scotty,
If you put one more little bend on the loop at the bottom of the lock, so that your stop is not hitting the back of the lock as it hangs, it will make your snare much faster. If the stop is hitting that lock, like yours is now, it transfers any pressure exerted to the cable to the lock and cause it to drag and take more pressure(elongation of the loop)before it snaps shut if loaded.
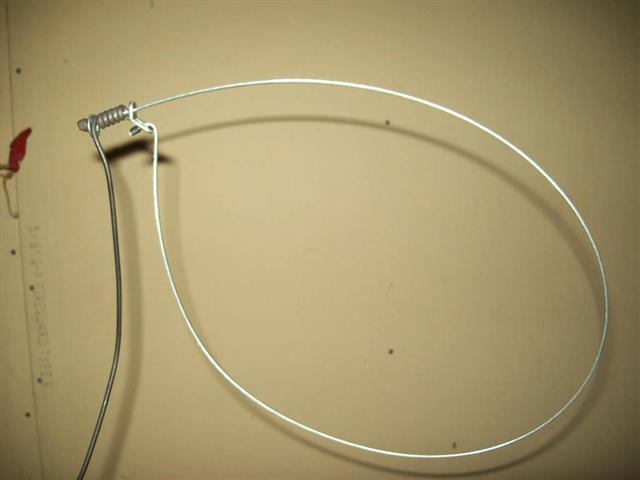
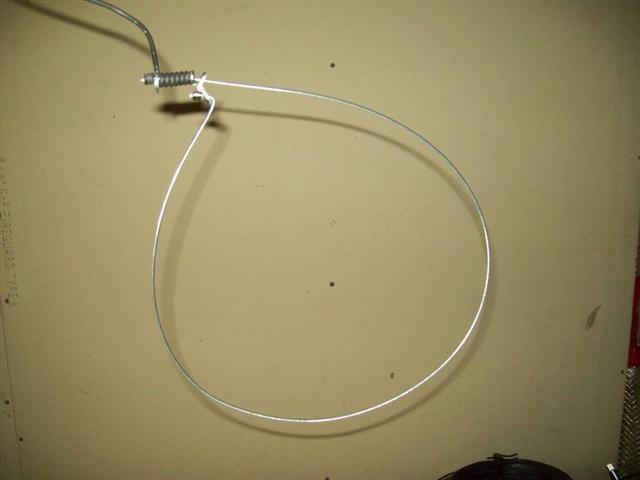
To load your snare, first pound a 1/4 smooth rod or barnpole spike into a wall at a height so you can walk up and set your chin on it, at a 90 degree angle to the wall. You will be "loading", aproximately 1/3 of the total cable that is in your loop when set. I first put a single stop on the length of cable I intend to use, and do them all at one time to increase production. Then lay that length of cable straight on a table. Then I pick the end of the cable up at the stop and leave the remainder of the cable laying on the table, and form a C shape with it. If the stop end of the cable is just resting in the palm of your hand while you push down gently with that hand, it will cause the length of cable to form to it's manufactured shape or show the direction and amount of "memory" or lay of the cable. When I find the memory direction, I then pinch the cable just a couple inches behind that stop, while still retaining that memory. Then with a pair of needlenosed pliers just behind the stop, I bend the cable OPPOSITE the lay of the cable. I move the pliers down about a 1/4" on the cable and repeat the bending sequence, down another 1/4" and repeat the sequence. When done correctly, it should now have a complete circle or "Cradle" where the lock will be, and the stop end of the cable will just about touch the cable.
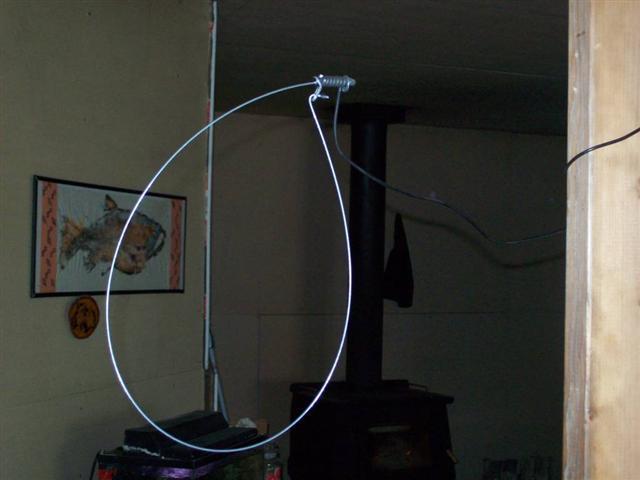
Now I take that length of cable to the pin on the wall, and hold the "cradle" in my left hand, while pinching the "cradle" between my left thumb and index finger. The cradle will show the direction of the lay of the cable, and when loading it you are just increasing the amount of memory in that piece of cable.Lay the piece of cable across the pin and control the direction you will be forming to by keeping track of the direction the cradle points. With my right hand I then pinch the cable (approximately 1/3 the length that is going to be in the final diameter, a 36" piece of cable I would shape 12"). I then pull the cable over the pin, starting at my left hand next to the cradle, and continue until I get to my right hand. I pull slightly harder when I first start and ease off as I approach my right hand. It is very important that you not pull too hard especially with 1x19 or 1x7 cables, as over shaping is easy to do and will result in a pigtailed appearance if over shaped, and if you pull too hard you can cause the cable to roll which results in loops that appear "cup shaped" as you look at them from above. You want to just increase the amount of memory in the cable, without causing it to roll, which shapes the side of the cable resulting in the "cup shaped" loops. The reason for the pin being at chin height, is that our arms will naturally pull straight down without to much fore and aft movement at this position. The reason for the small pin is to eliminate the need pull too hard, causing the cable to roll. If after loading, you let go of the cradle with your left hand it should spring to your right hand and form an upside down letter C or horseshoe shape. If you pulled too hard itwill just about come back and touch your right hand. Put a lock on the snare now and see if it gives you the closing and shape you desire. It it is still teardrop shaped you didn't pull hard enough. If it is oval shaped you pulled to hard.Only you will be able to tell what you want and for some critters (like mink and otter) I like the oval shape as it will be much faster than the more open teardrop shape. For larger lumbering, straight legged critters, like wolves or coyotes a more open loop is generally preferred. If you kept your "Cradle" straight while loading your snare will hang nice and straight and your lock will jump shut when the loop is elongated just a couple inches, the smaller and heavier the load the less elongation of the loop required to get it moving.Like mentioned above about the "cradle" and the lock base. It is very important that the hole in the bottom of the lock is not binding and the bottom of the lock should sit in the middle of the cradle, without the stop hitting the lock until the animal pulls it completely closed during it's lunging.
Not all locks are created equal nor lend themselves to smooth closing, some need to be altered some.
For Camlocs, instead of bending a cradle you still put a stop on first and form the C on the bench, which tells you the direction of the lay of the cable. The difference is you bend the cable at the stop at a 90 degree bend at a right angle to the lay of the cable. All that is required is a small "journal" for the levering end of the camloc to pivot on. I also put my camlocs on before shaping to give me something tp hold onto while loading. The camlocs are actually easier to make once you get the hang of it, but if the bend is not at a right angle to the lay of the cable it can also cause some binding while closing. You'll just have to ruin a few to get the hang of it like the rest of us. LOL