Fur Handling Archive


No Profanity *** No Flaming *** No Advertising *** No Anti Trappers *** No Politics
No Non-Target Catches *** No Links to Anti-trapping Sites *** No Avoiding Profanity Filter


Home~Trap Talk~ADC Forum~Trap Shed~Wilderness Trapping~International Trappers~Fur Handling

Auction Forum~Trapper Tips~Links~Gallery~Basic Sets~Convention Calendar~Chat~ Trap Collecting Forum

Trapper's Humor~Strictly Trapping~Fur Buyers Directory~Mugshots~Fur Sale Directory~Wildcrafting

Trapper's Tales~Words From The Past~Legends~Archives~Kids Forum~Lure Formulators Forum


~Catalog~

Print Thread
Hop To
Wooden board making, a tutorial. WITH PICS! #4038000
10/06/13 02:58 PM
10/06/13 02:58 PM
Joined: Mar 2013
Posts: 16,988
Fredonia, PA.
Finster Offline OP
trapper
Finster  Offline OP
trapper

Joined: Mar 2013
Posts: 16,988
Fredonia, PA.
There has been lots of post here recently about making wooden boards. How is it done, what wood to use, what are the measurements and various other questions. This is my attempt to answer some of these questions with a wooden board making tutorial. Mods if you like this tutorial, please make it a sticky thread. It may help redundant post in the future.
You can use almost any wood to make boards with. Basswood is preferred because it is clear (no knots) ,very soft and easy to work. However, most people do not have access to a good supply of basswood. Although not really ideal, plywood can be used. If you are using plywood take extra care to make sure that the edges are sanded very smooth so that they do not snag guard hairs of the fur putting it on and off. You can even use hardwoods although it would be a shame to waste good hardwood and driving tacks or nails in it would prove to be difficult.
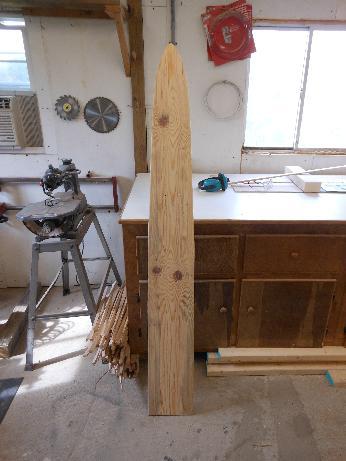
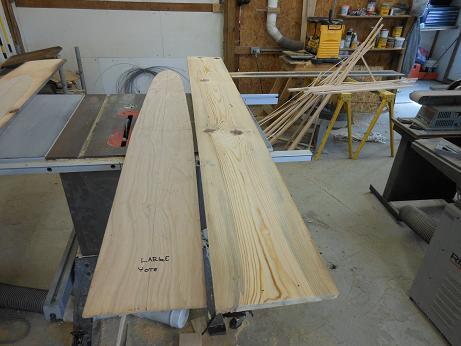
I like pine. In my area of the country, it is easy to come by and if you go to the local mill it is cheap. The drawbacks are that it is knotty and sometimes it can have a lot of sap which you absolutely do not want on a stretching board. There are ways to overcome these obstacles. The easiest is cutting the knots out of the finished board and plugging it. If anyone does not understand this, perhaps I will add to this tutorial the next time I perform that task. As with any wood, make sure it is properly dry. Either by letting it sit for a period of time, buying kiln dried lumber or like I am doing in this tutorial, use recycled lumber. This particular lumber is recycled barn siding. It has been triple checked for any leftover nails before any machining was done. Make sure you do this. It will prevent dull and chipped blades. It is a safety factor also, you don’t need a nail flying out of a planer at 50mph!
I am an accomplished woodworker with a full shop. A lot of you will not have these tools. However, you may have a friend that does or you may use sized lumber and not really need all of these tools. This is a general tutorial of the steps I preformed using recycled lumber. Feel free to tweak them to suite your needs. The board I am making here is for a large coyote however, it is the same process for any board. I am shaping it to NAFA specs. You can download the NAFA fur handling manual here: http://www.nafa.ca/wild-fur/resources I hope this helps everyone and also hope you enjoy.

Finally, on with the show:

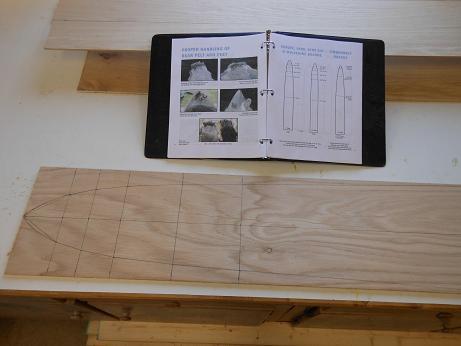
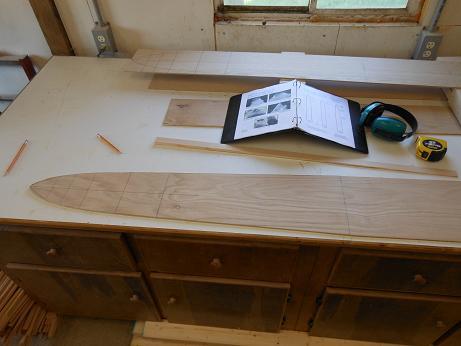
1. The first thing I do is make a pattern out of ¼” plywood also know as sub flooring. I cut a strip to the widest point of the board and cut the strip to length. Mark a center line down the length of the board. Using your measurements that are in the NAFA handbook, lay out the appropriate distances and draw lines across. From your center line split all of the measurements in half and put a mark on each half of the centerline. After that has been completed, just connect the dots with a strait edge. Up at the nose, I just draw straight lines for reference and use a little poetic license to draw a nice rounded shape freehand.


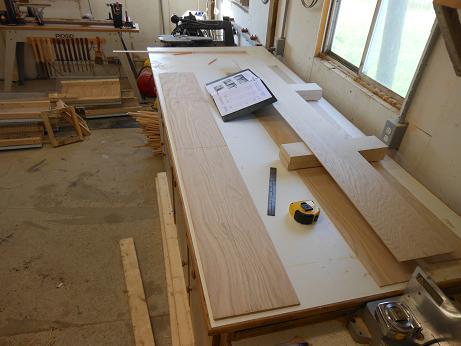
2. Cut this out on a table saw or use a jigsaw keeping the line visible. When cutting is complete, sand the edges to the lines giving the pattern a nice even flow. Now you have a pattern that you can use forever to make as many boards as you wish.


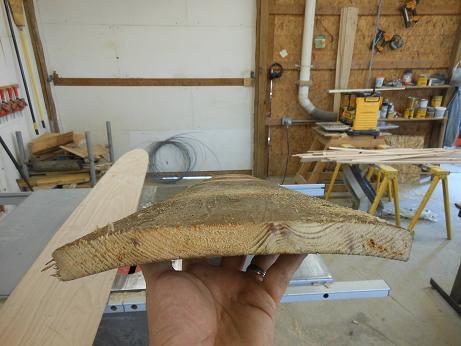
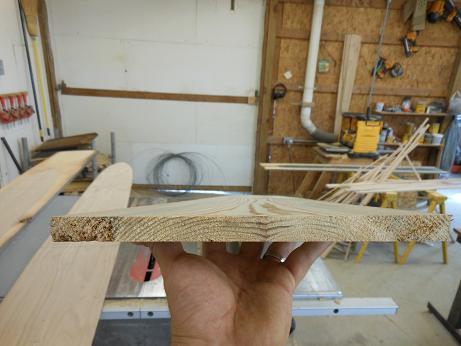
3. Here is my recycled barn siding. Yep, it is a little rough and horribly cupped. Normally, the way to get the cupping out is by machining one side on a jointer first. However, this is a very wide board. Much to wide for my jointer and to wide for most home shop jointers. A planer is the only way to really get most of the cupping out without getting really involved. The trick is to plane with the dome of the cup hitting the blades first. When one side is fully planed you can then flip it over. Take extremely shallow cuts here. The rollers on the planer will want to push the cup down during the feeding process and the board will just recup after the pass. Shallow cuts are the key. Below is also a picture of the first pass through the planer.


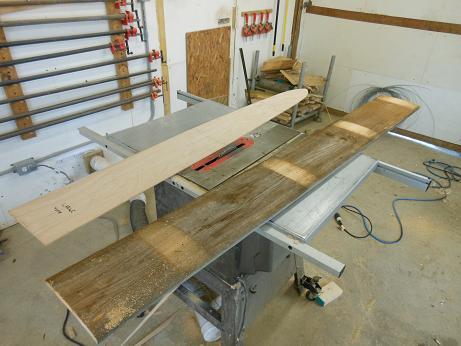
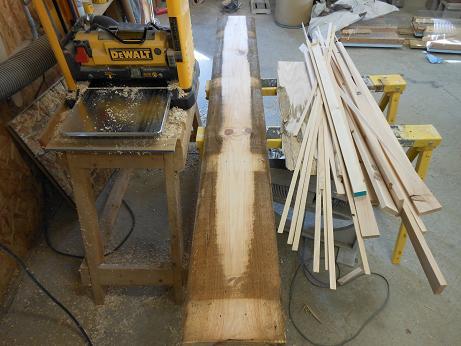
4. The board is now planed on both sides to a 5/8th thickness. As you can see 95% of the cupping is gone.


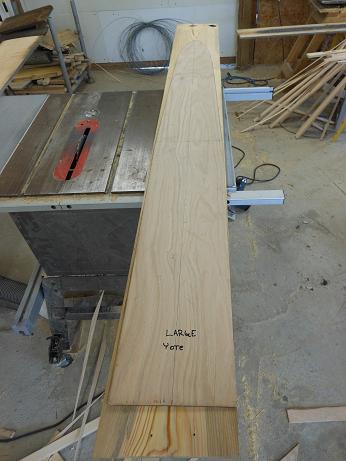
5. Placement of the pattern is next. If you are using a wood with knots, you want to make sure that the knots will be away from the edge of the board. You don’t want a knot popping out along the edge or it will have to be fixed because the fir will contour to the edge void when it dries and not want to release. Center your knots and Trace your pattern.

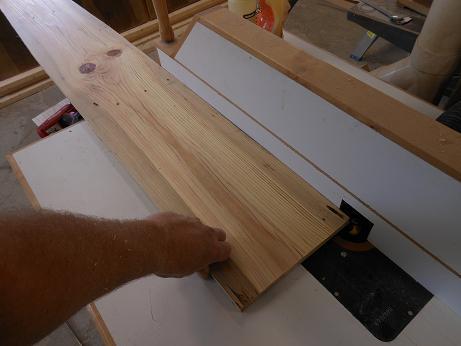
6. As with the pattern, you can cut out the stretcher with a table saw or jigsaw. Leave some space for sanding and after the board is cut out, sand the edges smooth up to your lines making a nice even flow to the board.


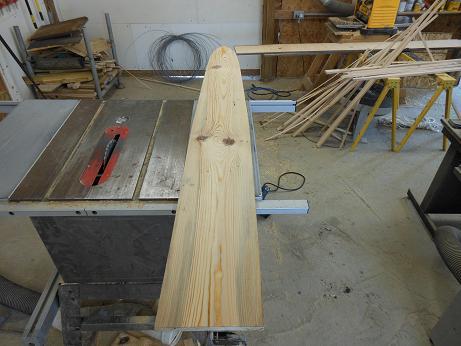
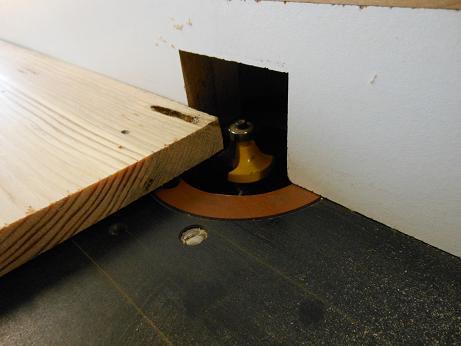
7. After sanding I use a router and give both sides of the board a rounded edge. This can be done freehand with your router if you don’t have a table. Set your router up on some of the scrap from cutting out the board. It would be a shame to cut to deep after all of this.


8. A final sanding. Sand the surface and smooth out any knots. Pay special attention to the edges. Sand them very smooth with a nice round to them. This will help the dried fur slide off and not pullout any guard hairs. Remember, if it’s rough on your finger, it to rough for fur.


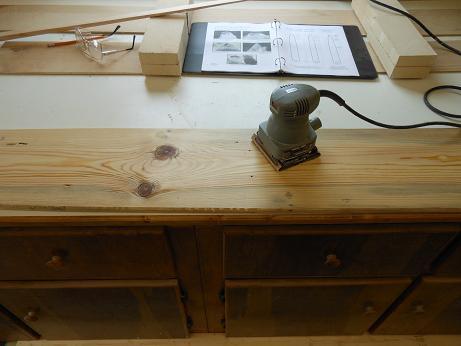
9. The final product, a large coyote board ready for fur. Hope you enjoyed this and it helps someone out.


I BELIEVE IN MY GOD, MY COUNTRY AND IN MYSELF.
Re: Wooden board making, a tutorial. WITH PICS! [Re: Finster] #4038050
10/06/13 03:33 PM
10/06/13 03:33 PM
Joined: Dec 2012
Posts: 10
KY and TN right now
Shawn Hines Offline
trapper
Shawn Hines  Offline
trapper

Joined: Dec 2012
Posts: 10
KY and TN right now
This is awesome, I have been looking to build a few more coon boards this year. This helps.


Shawn Hines
Active Trapper
Active Duty Military
Re: Wooden board making, a tutorial. WITH PICS! [Re: Dale Torma] #4038077
10/06/13 03:54 PM
10/06/13 03:54 PM
Joined: Mar 2013
Posts: 16,988
Fredonia, PA.
Finster Offline OP
trapper
Finster  Offline OP
trapper

Joined: Mar 2013
Posts: 16,988
Fredonia, PA.
Originally Posted By: Dale T

Don't forget to make belly boards out of the scraps.
LOL... You must of read my other post! grin


I BELIEVE IN MY GOD, MY COUNTRY AND IN MYSELF.
Re: Wooden board making, a tutorial. WITH PICS! [Re: Finster] #4038114
10/06/13 04:24 PM
10/06/13 04:24 PM

C
canvasback
Unregistered
canvasback
Unregistered
C


Good post, but I would do things just a bit differently.

1. Instead of cutting on the tablesaw or jigsaw, I would use a Pattern Cutting Router bit.

2. For the template, I would use thick Plexiglas instead of wood or Plywood

Re: Wooden board making, a tutorial. WITH PICS! [Re: ] #4038122
10/06/13 04:30 PM
10/06/13 04:30 PM
Joined: Mar 2013
Posts: 16,988
Fredonia, PA.
Finster Offline OP
trapper
Finster  Offline OP
trapper

Joined: Mar 2013
Posts: 16,988
Fredonia, PA.
Originally Posted By: canvasback
Good post, but I would do things just a bit differently.

1. Instead of cutting on the tablesaw or jigsaw, I would use a Pattern Cutting Router bit.

2. For the template, I would use thick Plexiglas instead of wood or Plywood

Good suggestions, I may try them myself. However, I don't see an advantage in using plexiglas. It is also harder for most people to machine. Cutting out a pattern with a router is a great idea though. I'm just not sure if it would save much time. Thank you for the suggestions and feedback I am going to try the router angle.


I BELIEVE IN MY GOD, MY COUNTRY AND IN MYSELF.
Re: Wooden board making, a tutorial. WITH PICS! [Re: Finster] #4038187
10/06/13 05:12 PM
10/06/13 05:12 PM
Joined: Nov 2007
Posts: 380
Carlisle, PA
T
trap-alaska Offline
trapper
trap-alaska  Offline
trapper
T

Joined: Nov 2007
Posts: 380
Carlisle, PA
I do what canvasback suggested and screw three or four boards together with the pattern on top. Run it through the band saw to get within 1/8" so it's easier on the bit and then and set the roller to hit the pattern and run it through the shaper. You can crank out a bunch in a hurry and then change over to the round-over bit.

Re: Wooden board making, a tutorial. WITH PICS! [Re: Finster] #4038208
10/06/13 05:33 PM
10/06/13 05:33 PM
Joined: Dec 2006
Posts: 7,628
evansville Indiana age72
don Wolf Offline
trapper
don Wolf  Offline
trapper

Joined: Dec 2006
Posts: 7,628
evansville Indiana age72
I also use a pattern and router to get my shape. The shape will be a lot more uniform. You can rough them on a bandsaw pretty darn quick if your not trying to be real close on the bandsaw. Most all boards finish at 1/2 inch.

Re: Wooden board making, a tutorial. WITH PICS! [Re: Finster] #4038244
10/06/13 06:10 PM
10/06/13 06:10 PM
Joined: Jul 2013
Posts: 44
Alabama
Roll Tide Offline
trapper
Roll Tide  Offline
trapper

Joined: Jul 2013
Posts: 44
Alabama
t


When Christ died, he died for you individually just as much as if you had been the only person in the world.
Re: Wooden board making, a tutorial. WITH PICS! [Re: bowhunter27295] #4039081
10/07/13 06:16 AM
10/07/13 06:16 AM
Joined: Mar 2013
Posts: 16,988
Fredonia, PA.
Finster Offline OP
trapper
Finster  Offline OP
trapper

Joined: Mar 2013
Posts: 16,988
Fredonia, PA.
Originally Posted By: bowhunter27295
Excellent tutorial. Almost exactly what I do.

I would however recommend switching to a staple gun if using this wood. You'll play heck getting a pin in that wood.

But don't get me wrong. You did an excellent job with this thread.

I would add making a wedge from the scrap and rounding the top edge of the wedge.

Well done.

This wood is pretty soft, I can put a push pin in it with no problem. However, I do plan on using my brad nailer this season with just enough pressure to cycle the gun. It will make things a bit easier.


I BELIEVE IN MY GOD, MY COUNTRY AND IN MYSELF.
Re: Wooden board making, a tutorial. WITH PICS! [Re: Finster] #4039105
10/07/13 06:57 AM
10/07/13 06:57 AM
Joined: Dec 2006
Posts: 8,720
South Central Nebraska age 71
tmrschessie Offline
trapper
tmrschessie  Offline
trapper

Joined: Dec 2006
Posts: 8,720
South Central Nebraska age 71
Very nice post. Looks like most folks would have the basic equipment to follow along. Thank You for the time and effort to produce this thread. Tom

Re: Wooden board making, a tutorial. WITH PICS! [Re: Finster] #4039162
10/07/13 08:04 AM
10/07/13 08:04 AM
Joined: Oct 2009
Posts: 7,248
western mn
B
bucksnbears Offline
trapper
bucksnbears  Offline
trapper
B

Joined: Oct 2009
Posts: 7,248
western mn
good post.


swampgas chili and schmidt beer makes for a deadly combo

You have to remember that 1 out of 3 Democratic Voters is just as dumb as the other two.
Re: Wooden board making, a tutorial. WITH PICS! [Re: Finster] #4039226
10/07/13 09:07 AM
10/07/13 09:07 AM
Joined: Dec 2006
Posts: 7,475
WI>>>MN >>>WI
T-Rex Offline
trapper
T-Rex  Offline
trapper

Joined: Dec 2006
Posts: 7,475
WI>>>MN >>>WI
I need a little understanding of the cupping. By the looks of the cupping before pic., planing it flat would remove all the material and end up with nothing but sawdust.

Do those shallow passes relax the wood, and allow it to regain the flat shape? Or, am I missing something?


Man who mistake shillelagh for fairy wand; see pixie dust, also.
Re: Wooden board making, a tutorial. WITH PICS! [Re: Finster] #4039407
10/07/13 10:59 AM
10/07/13 10:59 AM

C
canvasback
Unregistered
canvasback
Unregistered
C


T-Rex:


If you don't have a Jointer that can handle that wide of a board in one pass, it's a little more work, but what you can also do is rip that board into 3 pieces. Run each board through the Jointer , so that it is flat on one side. Then, run each board through the planer until each board is equal thickness.

After running the boards through the Planer so that the 3 boards are now of equal thickness, you would then Biscuit Join the boards together. Clamping in place overnight to make sure the glue has fully set. I would then do a final sanding with either a finishing or Orbital Sander to make sure everything is nice and smooth.

If you really want to make them look nice and preserve them, you could put 4 or 5 coats of Polyurethane on them. You can also use Armor Seal Urethane Top Coat for a rock hard finish.

Re: Wooden board making, a tutorial. WITH PICS! [Re: Finster] #4039483
10/07/13 11:42 AM
10/07/13 11:42 AM
Joined: Mar 2013
Posts: 16,988
Fredonia, PA.
Finster Offline OP
trapper
Finster  Offline OP
trapper

Joined: Mar 2013
Posts: 16,988
Fredonia, PA.
Originally Posted By: T-Rex
I need a little understanding of the cupping. By the looks of the cupping before pic., planing it flat would remove all the material and end up with nothing but sawdust.

Do those shallow passes relax the wood, and allow it to regain the flat shape? Or, am I missing something?

It's strange but for some reason, this is an optical illusion from the camera somehow. Apparently not only does a camera add 10 pounds but also makes wood cupping worse.


I BELIEVE IN MY GOD, MY COUNTRY AND IN MYSELF.
Re: Wooden board making, a tutorial. WITH PICS! [Re: Finster] #4039508
10/07/13 11:58 AM
10/07/13 11:58 AM
Joined: Dec 2006
Posts: 7,628
evansville Indiana age72
don Wolf Offline
trapper
don Wolf  Offline
trapper

Joined: Dec 2006
Posts: 7,628
evansville Indiana age72
I can usually get most all if not all cupping out of boards using a planer. Like the man said, use light cuts to start out with and you will be happy. I have taken Basswood and set something heavy on different parts of the board and that gets a lot of cupping out.

Re: Wooden board making, a tutorial. WITH PICS! [Re: Finster] #4040067
10/07/13 06:12 PM
10/07/13 06:12 PM
Joined: Dec 2006
Posts: 19,926
SEPA
L
Lugnut Offline
trapper
Lugnut  Offline
trapper
L

Joined: Dec 2006
Posts: 19,926
SEPA
I've never had much luck using a planer to remove cupping. And I have the same planer your using! I'm probably taking too deep a cut, the rollers flatten the board, the knives make a cut the width of the board and it comes out the other side still cupped.

I solved the problem by not working with cupped wood!


Eh...wot?

Re: Wooden board making, a tutorial. WITH PICS! [Re: Finster] #4040071
10/07/13 06:14 PM
10/07/13 06:14 PM
Joined: Dec 2006
Posts: 19,926
SEPA
L
Lugnut Offline
trapper
Lugnut  Offline
trapper
L

Joined: Dec 2006
Posts: 19,926
SEPA
Good post BTW.


Eh...wot?

Re: Wooden board making, a tutorial. WITH PICS! [Re: Lugnut] #4040088
10/07/13 06:28 PM
10/07/13 06:28 PM
Joined: Mar 2013
Posts: 16,988
Fredonia, PA.
Finster Offline OP
trapper
Finster  Offline OP
trapper

Joined: Mar 2013
Posts: 16,988
Fredonia, PA.
Originally Posted By: Lugnut
I've never had much luck using a planer to remove cupping. And I have the same planer your using! I'm probably taking too deep a cut, the rollers flatten the board, the knives make a cut the width of the board and it comes out the other side still cupped.

I solved the problem by not working with cupped wood!

That's exactly what you are doing. You are taking to deep a cut. The rollers will flatten the board and after the pass the board will just spring back. Try this, run the board through until you just touch the surface with the blades and I mean just touch! You won't get the blades to contact the wood for the entire length of the board. In fact it will probably only be in spots. After that, I would just do 1/4 turns. I believe that is 1/64th" until the entire side of the board is planed. You can flip it over after that and go hog wild taking deep cuts on the other side.It will work.... Trust me. I just planed down a bunch of lumber for fox boards. You will never get totally rid of the cupping with a planer only but you will get rid of most of it.


I BELIEVE IN MY GOD, MY COUNTRY AND IN MYSELF.
Previous Thread
Index
Next Thread

Moderated by  Wolfdog91 

Powered by UBB.threads™ PHP Forum Software 7.7.1