I had a shorter version of this published in 2017. Thought it might be helpful to those just entering trapping and T-Man.
Introduction to Trapping© Peter J Eisert
Now is a great time to get into trapping if you have been thinking about it. Fur prices are at an all-time low and there are less folks trapping because of it. This increases your opportunity to gain ground and develop relationships with land owners. It is also a good time to go flea markets, yard sales, and watch classifieds online and in the paper for trappers selling out.
I have been trapping only for a couple years and have learned largely what not to do. I never seem to have the easy button to push. There are many expert trappers that share their tips on making dirt hole sets or the best way to deploy cable restraints. I am not that person. What I do have is some understanding about entering this new outdoor experience.
Once you have decided that you want to give trapping a try, find an experienced mentor. Having someone that has been doing this for years will help shorten the learning curve. More importantly, ask if they would be willing to let you tag along while they work their line. This way you can gain some insight into trapping without laying out a pile of cash. Many trappers have multiples of everything, maybe they would even loan you supplies for your first year. Trapping can get expensive very quickly. Be sure to throw in a please and thank you. It can make a difference!
If you lack a mentor, move onto plan B, buy or check the library for books or start watching YouTube videos. Both of these options are flush with education. I have found the Guide to Trapping by Jim Spencer, A Guide for Better Trapping, by Tom Krause, and Land Sets and Trapping Techniques, by Charles L. Dobbins the most helpful to me. There are many general, species, and trap specific books available. While I enjoy reading, it is hard to beat watching a set being made from start to finish on video, versus looking at a black and white photo. I personally find Coon Creek Outdoors, Sam Wood Outdoors, and Wilderness Outfitters to be helpful, although there are many quality YouTube trapping channels.
If you want to be quickly overwhelmed and confused, go trap shopping. The main types of traps include: Long and coil springs, body grippers, cage, snare, cable restraint, and dog proof (DP). It spirals out of control after that with all the variations and sizes. Although, it really isnt much different than hunting if you do that already. For example, at deer camp we had 10 hunters who used 9 differing gun models in 7 differing calibers, and 9 differing ammunition types. Each of us pursuing the same animal! Trapping is no different.
Before you commit your hard earned money to buying steel, you should think about a few things. First, what furbearers are available in your area and what will be your target animal(s)? In my area, raccoon, opossum, fox, and skunk are abundant with an occasional coyote. Furbearers like bobcats, fishers, and otters are not to be trapped in our Wildlife Management Area, so unless I travel, they are off the table. This helps narrow the types of traps needed. Most trappers would agree that a 1 ½ coil spring would be fine for most of the furbearers in my area. However, a 1 ¾ would offer better holding power if a coyote comes along. Since raccoon is abundant behind my home and my neighbor allows their cats to roam the area, I use dog proof traps with a fruity bait to help avoid the felines. It is best to be proactive in avoiding problems.
Next, determine where are you going to set and how much time you have available. If these two things are limited, you may only need a handful of traps. There is no need to rush out and buy dozens of traps if you only have a couple acres available and a tight schedule. In Pennsylvania, traps will need checked at least every 36 hours, but best practice is a daily check. Consider how trapping fits into your daily schedule and know things always take longer than you plan, especially in the dark. You will need to check your traps and take care of fleshing and skinning on top of your other responsibilities. If time and place is limited, so should your stock pile of traps, as there are plenty of other needs when starting out.
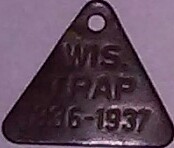
Another deciding factor in trap selection is your state regulations. Always read the game laws and know what traps are legal and what are not. Know and practice the trap check regulation. Ignorance is not a sound defense strategy! Traps need identification on them and the required information varies from state to state. Be sure it is durable and recheck its presence after each catch, as they can come loose and fall off. I use the copper tags that are rolled around a link of chain.
Always buy the best equipment you can afford. I hear some trappers brag that they only use the least expensive traps on the market. Then later in the conversation they tell you of all the modifications that they make. After they are done, it doesnt even look like the same trap! After all the time and money in the modifications, it might have been worth a few dollars more at the initial purchase to buy a better trap. If you are trapping on public land, know that some folks will find and steal your traps. It is best to keep them off highly used travel areas, especially those used by hunting dogs. Even though you have the same right to be there, be proactive and prevent problems from occurring.
Another trap consideration is sticking with one brand of trap. Ill be honest, I havent done well with this. Now that I have some experience, I have decided on one brand and will do my best to stick with that. It just makes sense logistically.
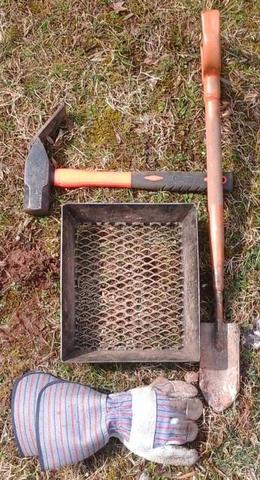
When it comes to the basic equipment, most trappers would agree that a trowel, hammer, dirt shifter, and a container to put everything in is essential. Keep in mind that a land trapper who is setting coil or long spring traps will be using this equipment at almost every set they make. For this reason, I chose to spend more to get higher quality gear. Again, buy what you can afford.
As far as a container, some trappers use a five gallon bucket, some a pack basket. I made my own basket from milk crates and an old military backpack frame. One consideration is how far you are traveling and by what means. If traveling by foot, carrying a bucket filled with traps and equipment for a short distance may not be a problem, but for a mile it may be. Carrying weight on your back is easier than in your hands. Gloves are also important, but no need to spend top dollar.

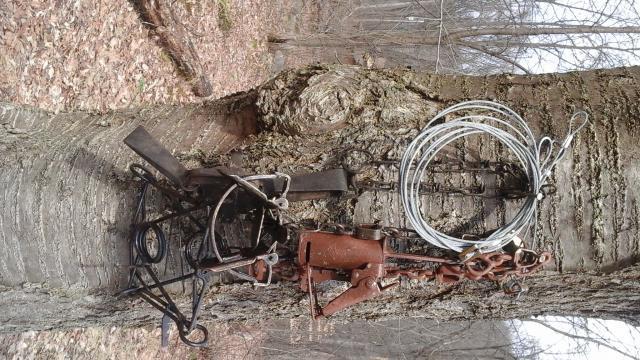
When it comes to anchoring your traps, there are many options, but staking is the most popular method. I purchased several dozen rebar stakes between 18-24 inches and carried them around for the first two seasons. They arent light. I switched to cable stakes this year and I am glad I made the change. They are significantly lighter and easy to use. Cable stakes are also called disposable in that you can cut the cable and leave the anchor in the ground. I try to avoid this as a general rule, especially in a farmers field. Cables (length of cable with loops on each end) are also a light weight alternative. Some trappers use these to anchor the trap, especially DPs, to trees, a log, or some other heavy object. Using a log or object is sometimes referred to as a clog.
Another method is a drag, which looks like an anchor and has ~ 10 feet of chain. Like traps, there are many varieties. I often find chain at flea markets or auctions for cheap. I did buy some new chain and it was actually cheaper to buy from a trapping supply company and pay shipping than to buy at the local box store. Other hardware needs such as quick links are also cheaper through trapping supply houses. I try to buy from a local dealer whenever possible. Chances are you will find that each of these anchoring options will have a place on your line. However, if I had to choose one, I would go with the cable stakes. These simply meet my trapping needs.
There are many resources available that describes what can be used to bed a trap. Some use the soil dug out to make the bed, peat moss, or even waxed dirt. Many trappers use a pan cover to prevent soil from getting under the pan. This may be made from a window screen or even wax paper. It boils down to preference. Recall the comment about sticking with one brand of trap? Buying precut pan covers makes life easier, but it is challenging when you have multiple brands of traps. You may need to carry scissors to cut them down.
I spent a lot of time researching lures. What I discovered is that animal attractants are designed to attract both animals and trappers. They have exciting names and cool labels to entice us and stinky stuff to catch furbearers. Heres the take home- you wont need 50 different lures to catch a critter.
Just get a couple to start with. Overtime you will acquire more, the names and labels will eventually be attractive enough to get you to part with your money. Be sure to handle them all carefully and not open them in the house as you may become unpopular with the other inhabitants.
When checking your traps have a catch pole handy. This is a pole with a loop that allows you to hold onto the animal while you release it from the trap. I had a friend help me on my line and I practiced this skill with him as he served as a second set of eyes and hands.
There are many behind the scenes items that will find their way into your trapping supplies. I keep quick connects, J-hooks, swivels, and identification tags on hand at all times. Be sure to get a good J-hook tool, as well as cable cutters if using cable, pliers, and a screw driver appropriate for your pan tension screws. Traps are not ready-to-go straight from the box. You will also need a way to clean, dye and wax your traps. There are a couple of products that do not require waxing. Be sure to do some research to see what method that will work for you.
Before you set your first trap, make a plan of how you will handle a catch. This includes dispatch. Be sure to handle this quickly and humanely as possible. The Pennsylvania Trappers Associations slogan is our image is our future. Please remember that when you trap. After dispatch you will either need to handle the skinning and fleshing yourself or sell the entire animal to a fur buyer. If you are planning to sell the whole animal to a buyer make sure you telephone ahead to ensure that they will accept it. With prices down, some buyers are not doing this.

The first step in handling fur yourself is having a place to do it. Our image is our future, so skinning animals off the basketball hoop in the driveway in your housing development may not be best plan for public relations. This process is messy so be prepared for blood and fat to be on the floor and probably stepped in.
Disease and parasites can be transmitted in the skinning and fleshing process so a rubber apron and rubber gloves are needed. Remember not to touch your face with gloves that were used in the handling process. A gambrel to hang your furbearer on will be needed, as well as a skinning knife, tail stripper and zipper, and fleshing knife. Like everything else there is a continuum of quality. In my limited experience with these items, I discovered a quality fleshing knife is the most important. Before you can flesh, a fleshing board will be needed. This is something you can make or buy.
After your catch has been fleshed it will need to be stretched. There are wire and wood stretchers available. Personally, I own wire stretchers because I found them at the flea market for a reasonable price and it is what I have. I have watched demonstrations with wood stretchers and think those would be easier to use, but I havent had the opportunity to give them a try.
Now that you have skinned, fleshed, and stretched your furbearer you need to dispose of the carcass. Do not wait until you have a handful of critters to figure this out. Perhaps the farmer is okay with you disposing the carcass on the property, ask first. In Pennsylvania, trappers cannot use bait visible from the air, so dont set a trap next to the carcass pile. If you are planning to dispose carcasses in the garbage at home, be respectful to the people that pick up your trash. Put the carcasses in a bag and be aware of any ordnances related to this. Keep in mind that even in cool weather that these may begin to stink and those in your home or neighborhood might not share your passions. Our Image includes the smell coming from the fur shed.
I have quoted, our image is our future multiple times and it is probably more important now than ever before. Think about all the video that is being taken today and how quickly things are spread on social media. Always conduct yourself like someone is watching or recording you, even when you are out on the line. Check your traps per regulations or even more frequently. Perform dispatch quickly and in a humane way, treat the animals you have caught with respect, and dispose of the carcass properly. Have a responsible answer before your even asked why you trap. It only takes one negative incident to polarize people against trapping. Be the positive influence!
One of the ways you can you can help keep the trapping tradition strong is by becoming a member of your state trapping organization. The National Trappers Association and Fur Takers of America are national organizations that educate the public about trapping, provide educational and social activities for its members, and defend the privilege of trapping for each of us. Consider membership in the organization of your choice.